Radix 4.x
Documentation for Radix 3.x for Drupal.
Tip
Starting a new project?. Consider Radix 4.x with Bootstrap 4.
Requirements
- npm - Read a guide on how to install Node and npm here.
- Gulp -
npm install gulp -g - Bower -
npm install bower -g - Drush - Read a guide on how to install Drush here.
- jQuery 1.7+ - Radix needs jQuery 1.7 for Drupal 7. You can install jQuery 1.7 via jquery_update module or jquery_multi module.
Drupal 8
- Download and enable radix:
drush dl radix; drush en radix -y; drush config-set system.theme default radix -y. - Create a subtheme:
drush cc drush; drush radix "SUBTHEME NAME". - Set default theme:
drush en SUBTHEME_NAME -y; drush config-set system.theme default SUBTHEME_NAME -y. - Install required modules:
cd /path/to/SUBTHEME_NAME; npm run setup;. - Update proxy in
/path/to/SUBTHEME_NAME/config.json. - Watch:
gulp.
Drupal 7
- Download and enable Radix:
drush en radix -y; drush vset theme_default radix. - Create a subtheme:
drush cc all; drush radix "Subtheme". - Set default theme:
drush en subtheme -y; drush vset theme_default subtheme. - Install required modules:
cd /path/to/subtheme; npm run setup. - Update browserSyncProxy in /path/to/subtheme/config.json.
- Run gulp to watch for changes:
gulp.
If drush radix is failing, run drush cc drush and try again.
Custom subtheme
Customize your subtheme using options. To see a list of options, run: drush radix --help.
machine_name - By default, Radix will use the name provided to create a machine name for your theme. You can set your own machine name using this command.
drush radix "Name of theme" --machine_name=custom_machine_name
description - Replaces the default theme description.
drush radix "Name of theme" --description="Custom description for your theme"
destination - By default, your subtheme is placed inside /sites/all/themes. If you want to change its location, you can specify here.
drush radix "Name of theme" --destination=/sites/lipsum/themes
bootswatch - If you want to use a Bootswatch theme, use it as follows. See the section on Bootswatch for more details.
drush radix "Name of theme" --bootswatch=cerulean
Note: This requires unzip to be available on your system.
BrowserSync
BrowserSync detects changes in your theme files and automatically reloads the browser for you. If you have multiple devices connected to the site, BrowserSync will synchronize changes across the devices.
Here's a quick overview on how BrowserSync can be helpful:
- Syncs mouse scroll across your devices.
- Keep tracks of clicks and form changes.
- Watch local source files and automatically refresh browsers on all devices when a change is made.
Radix has BrowserSync built-in. All you need to do is update the browserSyncProxy value in config.json with the url of your site. Example:
if your site is currently being served at http://drupal.dev, the value of browserSyncProxy should be "browserSyncProxy" : "http://drupal.dev",.
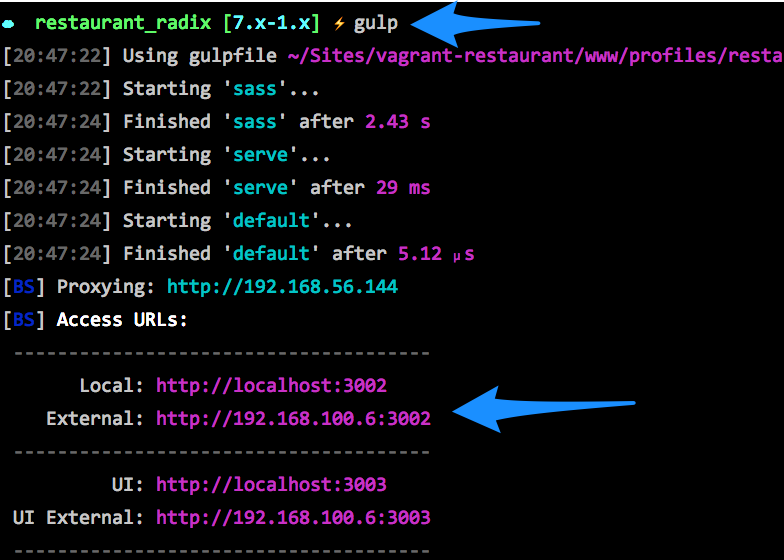
How to test your site on multiple devices
When you run gulp you should see local and external access urls as shown below. Use the external address to view your site on other devices.
Responsive theming using breakpoint.
Radix follows the mobile-first convention for responsive theming. To help with that, Radix provides a breakpoint mixin. Here's how you can use the breakpoint mixin to style the body for different breakpoints:
body {
  background: red; // Body will have background: red for all xs devices.

  @include breakpoint(sm) {
    background: blue; // As from sm devices, the background will be blue.
  }

  @include breakpoint(md) {
    background: yelllow; // Yellow background for md devices.
  }

  @include breakpoint(lg) {
    background: green; // Green background for lg devices.
  }
}
Example with different style for sm and md devices:
body {
  background: red; // Body will have background: red for all xs and sm devices.

  @include breakpoint(md) {
    background: blue; // Blue background for md and lg devices.
  }
}
Example with a stacked list on mobile and inline list on desktop:
ul.menu {

  li {
    margin: 0 0 10px;

    @include breakpoint(md) {
      float: left;
      margin: 0 5px;
    }
  }
}
Bower
How to add bower components to your subtheme?
- Go to the root of your subtheme:
cd /themes/subtheme. - Run
bower install. Examplebower install imagesloaded --save.
This command will install the bower component and update your bower.json file.
Bower components in git?
Need to commit your bower components in your git repo? Edit .gitignore file for your subtheme and remove bower_components.
Upgrade
Older versions of Radix used Compass gems to compile Sass.
To upgrade to the Gulp version, use the following Drush command: drush radix-upgrade-33 theme_name.
FAQs
How to disable Drupal cache during development?
- Step 1: Uncomment the following lines in your
settings.phpfile:
if (file_exists(__DIR__ . '/settings.local.php')) {
  include __DIR__ . '/settings.local.php';
}
- Step 2: Copy
example.settings.local.phptosites/defaultand rename it tosettings.local.php. - Step 3: In
settings.local.php, replace the following line$settings['container_yamls'][] = DRUPAL_ROOT . '/sites/development.services.yml';with$settings['container_yamls'][] = DRUPAL_ROOT . '/sites/default/local.services.yml';. - Step 4: Disable the render cache by uncommenting the following line:
$settings['cache']['bins']['render'] = 'cache.backend.null';. - Step 5: Disable the Dynamic Page Cache by uncommenting the following line:
$settings['cache']['bins']['dynamic_page_cache'] = 'cache.backend.null';. - Step 6: Copy
development.services.ymltolocal.services.yml. - Step 7: Add the following in your local.services.yml`:
# Local development services.
#
# To activate this feature, follow the instructions at the top of the
# 'example.settings.local.php' file, which sits next to this file.
services:
  cache.backend.null:
    class: Drupal\Core\Cache\NullBackendFactory
parameters:
  twig.config:
    debug: true
    cache: false
- Step 8: Rebuild your cache:
drush cr;
See examples that you can copy and paste:
- settings.local.php: https://gist.github.com/arshad/ce321088195b0834dfbd1dc92e585d99
- local.services.yml: https://gist.github.com/arshad/f36883a614bb849984ce7b0046f7c677
Custom Kit
Radix has support for custom kits. A custom kit has the default Radix theme files with customizations added.
To create a custom kit, there are a few conventions to follow:
- Your kit must be prefixed with
radix-kit-. Exampleradix-kit-awesome. - The
.info.yml,.theme,.libraries,.breakpoints.yml,style.cssandscript.jsmust have the same name as the kit. Example:awesome.info.yml,awesome.theme,awesome.libraries,awesome.breakpoints.yml,awesome.style.cssandawesome.script.js.
See the default kit as an example: https://github.com/radixtheme/radix/tree/8.x-3.x/kits/default
Support
- Create an issue on drupal.org.
- Ask us on Twitter: @radixtheme.